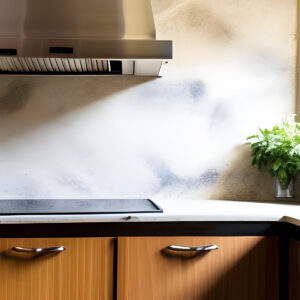
The good news is you can easily remove burn marks from your walls with just a few items and tools you can get at your local hardware store. Let’s take a look at the step-by-step process as well as some tips for success!
Step-by-Step Process to Remove Burn Marks
Before we jump into the process of cleaning burn marks, let’s first understand why they are so difficult to clean. The reason behind this is that the heat from the fire causes a chemical reaction, which results in the chemical composition of the surface being altered. This alteration means that the burn marks can no longer be removed using traditional cleaning methods. Therefore, we must employ a specific method to remove them.
Generally speaking, it’s recommended to remove soot from your burnt walls as soon as you spot it. Allowing soot to accumulate can exacerbate the problem and make the cleaning process much more challenging over time.
Here is a step-by-step guide to removing soot stains and burn marks from your walls:
Step One: Gather Materials and Prepare Yourself and the Area
Before we start the cleaning process, we need to gather the materials and tools required. You’ll need:
- Safety equipment including rubber gloves, safety glasses, and a mask
- Drop cloths
- Step stool or ladder (if burn marks are out of reach)
- Buckets
- Soot sponge
- Utility knife
- Vacuum
- Dishwashing liquid
When you start to remove the soot particles from the burnt wall, some will become airborne. To protect your floor and prevent soot particles from settling on upholstery, carpeting, and other areas of your home, lay drop cloths throughout the room. You will basically want to cover anything you don’t want to get dirty with soot!
Step Two: Give Yourself Some Air
As mentioned, soot particles contain contaminants and can be toxic. To protect your respiratory system, wear a mask and ventilate the room. Open windows to provide some fresh air. Use fans to draw the particles out of the room.
Note: after you are finished with the entire process, change your air filters.
Step Three: Vaccum the Walls
Vacuum the area around the burn marks to remove any loose soot particles. Use a soft brush or upholstery attachment for the vacuum cleaner.
For stubborn areas, use a scrub brush with firm bristles to loosen particles. Use a gentle back-and-forth motion over the area.
Step Four: Clean the Area with Soot Sponge
There are several types of sponges specifically designed for soot removal, often referred to as dry cleaning sponges, soot sponges, or chemical sponges. These are different from regular sponges and are made from a substance called vulcanized rubber. They are excellent at attracting and holding onto soot particles, effectively lifting them from solid surfaces. Most hardware stores carry these types of specialty sponges.
As you use the sponge, it will gradually darken due to the absorbed soot. Once this happens, switch to a clean section of the sponge. If the entire sponge is dirty, you can use a utility blade to shave off a thin layer, revealing a fresh surface underneath. Avoid rinsing the sponge with water, as this will render it ineffective.
Begin the cleaning process from the ceiling, then proceed to the upper part of the wall, working downwards. Use overlapping, straight strokes rather than scrubbing motions. The goal is to capture soot particles, not spread them around. While the sponge may not completely eliminate all soot stains, it will certainly remove loose particles. Always complete the dry cleaning process before proceeding to any wet cleaning methods.
Step Five: Clean Residual Stain with Water and Detergent
For any remaining burn stains on your walls or ceiling, a wet cleaning method will be necessary.
Trisodium phosphate (TSP) is often considered the top choice for soot removal. However, due to its potency, it should be used conservatively and only as a final resort. Thus, ensure you’ve tried other methods first to remove as much soot as possible before preparing a minimal batch of TSP.
Should TSP be unavailable where you live, there are comparable soot removers that are phosphate-free (TSP-PF). Alternatively, a solution of water and dish soap with degreasing properties can also be effective.
- For a Trisodium phosphate solution: Combine two quarts of water with half a cup of powdered trisodium phosphate in a bucket. Stir until thoroughly mixed.
- For a TSP-PF solution: Follow the instructions on the product label for the correct water mixture.
- For a degreasing dish soap solution: In a bucket, combine two quarts of water with two tablespoons of dish soap. Stir until well combined.
Dip a regular cellulose sponge into the wet solution and wipe the walls from top to bottom where you see the burn stain. Rinse the sponge frequently and mix a fresh solution when it begins to turn grayish-black.
After you have cleaned the burnt walls with the solution, rinse the area with fresh water using a clean sponge. Let the area air dry. Remember cleaning burn marks from walls can take some time. Do not rush the process or apply too much pressure as it can damage the wall paint and the wall itself.
Tips for Success in Removing Burn Marks
Here are some additional tips to increase your chances of success, especially when dealing with stubborn burn marks:
- Use a high-quality scrub brush with firm bristles to help break down burn marks and remove them successfully.
- Always test the cleaning solution on a small, inconspicuous area first before applying it to the burn stain.
- Be cautious when using abrasive cleaners because they can damage your wall and paint.
- In case of a severe burn mark, it’s recommended to seek professional help to avoid causing further damage to your walls.
Dealing with burn marks on walls can be a real pain, but it’s essential to take care of them sooner rather than later. From harmful soot to unsightly stains, these issues can pose a threat to your family’s health and the appearance of your home. Fortunately, with the right approach and materials, removing burn marks from walls is a straightforward and achievable task. By following the step-by-step process, you’ll have your walls looking as good as new in no time!
Fire Damage Restoration Services in PA and MD
At Reynolds Restoration Services, our team of professional, certified, and trained restoration technicians has the tools and equipment to help homeowners restore their homes after a loss such as a fire. If you are dealing with the aftermath of an emergency, contact us today for help.
We are a restoration company in Harrisburg, Pa., Philadelphia, Pa., and the Baltimore/DC metro region, we can be on-site to most areas in the mid-Atlantic region in less than 90 minutes. While we hope you never need us, we are on-call 24/7/365 in case you do!

President of Reynolds Restoration Services. Over 20 years of experience in the emergency restoration industry.

